
pacemaker+corosync
pacemake+corosync示例:
本实验旨在创建一个高可用的mariadb-glance 集群。。使用pacemaker fence设备。。keepalived. 技术。。。创建的一个example,。可以结合很多好玩技术。。。openstack 用高可用。把各个组件都做高可用。。后面有机会在写。。不过现在技术更新迭代很快。可能不太适用了。。
一,实验环境
在一台kvm 虚拟机内部创建了三台机器
kvm主机 | 192.168.41.160 | kvm |
|---|---|---|
vm1 | 192.168.122.160 | controller1 |
vm2 | 192.168.122.170 | controller2 |
vm3 | 192.168.122.180 | controller3 |
[root@rysnc-server ~]# virsh  list --all
 Id    名称                         状态
----------------------------------------------------
 1     vm1                            running
 2     vm2                            running
 3     vm3                            running
这个vm1 ,vm2,vm3,等会fence 时用得到
二,初识化集群:
这不用写了吧。关防火墙,关selinux,时间同步,host解析,yum源设置等等等
三,安装pacemaker
所有节点:
1,安装软件包
yum -y install pacemaker pcs 2,配置互信,所有节点互相认证互信
ssh-keygen
ssh-copyid
3,所有节点更改hacluster 令牌,集群初识化时会验证
echo redhat |passwd --stdin hacluster 4,controller1和controller2启动服务
[root@controller1 ~]# systemctl start  pcsd.service
[root@controller2 ~]# systemctl start  pcsd
[root@controller2 ~]# systemctl status pcsd
● pcsd.service - PCS GUI and remote configuration interface
   Loaded: loaded (/usr/lib/systemd/system/pcsd.service; disabled; vendor preset: disabled)
   Active: active (running) since 二 2023-09-05 10:25:45 CST; 4s ago
     Docs: man:pcsd(8)
           man:pcs(8)
 Main PID: 2217 (pcsd)
    Tasks: 6
   CGroup: /system.slice/pcsd.service
           └─2217 /usr/bin/ruby /usr/lib/pcsd/pcsd

9月 05 10:25:42 controller2 systemd[1]: Starting PCS GUI and remote configuration interface...
9月 05 10:25:45 controller2 systemd[1]: Started PCS GUI and remote configuration interface.
集群内任意一台机器
5,添加集群认证 输入hacluster 用户名和密码,这里我先加入两台后面再加一台好演示下如何添加主机节点
[root@controller1 ~]# pcs cluster auth  controller1 controller2
Username: hacluster
Password:
controller2: Authorized
controller1: Authorized
6,初始化加入集群
[root@controller1 ~]# pcs cluster auth  controller1 controller2
[root@controller1 ~]# pcs cluster setup  --start  --name cluster controller1 controller2
7,查看集群状态
[root@controller1 ~]# pcs  cluster  status
Cluster Status:
 Stack: corosync
 Current DC: controller2 (version 1.1.23-1.el7_9.1-9acf116022) - partition with quorum
 Last updated: Tue Sep  5 15:16:09 2023
 Last change: Tue Sep  5 15:15:17 2023 by hacluster via crmd on controller2
 2 nodes configured
 0 resource instances configured

PCSD Status:
  controller1: Online   #在线
  controller2: Online
[root@controller1 corosync]# pcs status
Cluster name: cluster

WARNINGS:
No stonith devices and stonith-enabled is not false

Stack: corosync
Current DC: controller2 (version 1.1.23-1.el7_9.1-9acf116022) - partition with quorum
Last updated: Tue Sep  5 15:25:43 2023
Last change: Tue Sep  5 15:15:17 2023 by hacluster via crmd on controller2

2 nodes configured
0 resource instances configured

Online: [ controller1 controller2 ]

No resources


Daemon Status:
  corosync: active/disabled
  pacemaker: active/disabled
  pcsd: active/disabled
注意 摧毁集群,pcs cluster destroy 是这个命令
利用hacluster 用户管理在一个多播域内的主机。 会监听2224 端口。。https://controller1.:2224 可以使用图形化创建集群。
如果有防火墙。开放2224 端口。开放high-availbility 服务
firewall-cmd  --permanent --add-service=high-availability
firewall-cmd --permanent --add-port=2224/tcp
基础命令:
pcs cluster sync 同步配置到所有节点
pcs cluster status ;pcs status 查看集群
8,集群扩容
重复上述1-4步骤
安装软件包。
开放防火墙
修改hacluster 密码
免密互信
加入认证。
controller3:
[root@controller3 ~]# pcs cluster  auth  controller1 controller2 controller3
Username: hacluster
Password:
controller3: Authorized
controller2: Authorized
controller1: Authorized
[root@controller3 ~]#
controller2:
[root@controller2 ~]# pcs cluster auth  controller3
Username: hacluster
Password:
controller3: Authorized
controller1
[root@controller1 ~]# pcs cluster auth  controller3
Username: hacluster
Password:
controller3: Authorized
集群中添加节点。
[root@controller1 ~]# pcs cluster  node add controller3
Disabling SBD service...
controller3: sbd disabled
Sending remote node configuration files to 'controller3'
controller3: successful distribution of the file 'pacemaker_remote authkey'
controller1: Corosync updated
controller2: Corosync updated
Setting up corosync...
controller3: Succeeded
Synchronizing pcsd certificates on nodes controller3...
controller3: Success
Restarting pcsd on the nodes in order to reload the certificates...
controller3: Success
查看添加:
[root@controller1 ~]# pcs cluster status
Cluster Status:
 Stack: corosync
 Current DC: controller2 (version 1.1.23-1.el7_9.1-9acf116022) - partition with quorum
 Last updated: Tue Sep  5 16:04:11 2023
 Last change: Tue Sep  5 15:15:17 2023 by hacluster via crmd on controller2
 2 nodes configured
 0 resource instances configured

PCSD Status:
  controller3: Online
  controller2: Online
  controller1: Online
四,配置fence 设备
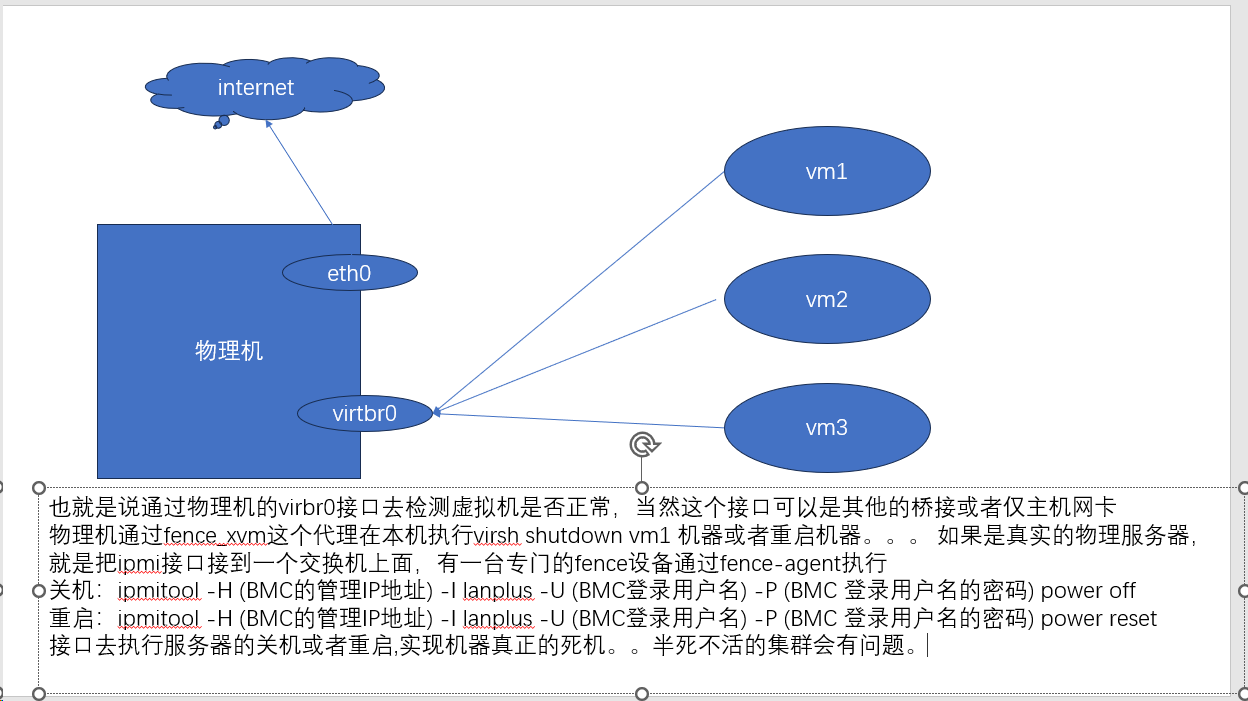
fence 栅栏的意思,,隔离。。可以搜一下基本概念。就是利用带外或者其他可监控的ip 再检测到节点出现问题时做出相应的动作,关机或者重启。就是从集群内踢出去,而不影响集群的服务。我这里只是做配置演示。原理 ..各个厂商用的agent 不一样。。下面有张简图不知道看的懂不!
1,所有节点安装fence代理软件包:(包括物理机)
yum install fence-agents-all fence-virtd fence-virtd-libvirt fence-virtd-multicast bind-utils tcpdump expect sos nfs-utils cifs-utils net-tools resource-agents -y2, 所有节点配置fenceing 设备密码:
mkdir /etc/cluster
echo redhat > /etc/cluster/fence_xvm.key
3,物理机配置fence配置文件:
[root@kvm ~]# fence_virtd -c
Module search path [/usr/lib64/fence-virt]:
Available backends:
    libvirt 0.3
Available listeners:
    tcp 0.1
    multicast 1.2
    serial 0.4

Listener modules are responsible for accepting requests
from fencing clients.

Listener module [multicast]:    #多播

The multicast listener module is designed for use environments
where the guests and hosts may communicate over a network using
multicast.

The multicast address is the address that a client will use to
send fencing requests to fence_virtd.

Multicast IP Address [225.0.0.12]:   #多播地址

Using ipv4 as family.

Multicast IP Port [1229]:   #端口

Setting a preferred interface causes fence_virtd to listen only
on that interface.  Normally, it listens on all interfaces.
In environments where the virtual machines are using the host
machine as a gateway, this *must* be set (typically to virbr0).
Set to 'none' for no interface.

Interface [virbr0]:               #使用接口

The key file is the shared key information which is used to
authenticate fencing requests.  The contents of this file must
be distributed to each physical host and virtual machine within
a cluster.

Key File [/etc/cluster/fence_xvm.key]:    #交互验证key

Backend modules are responsible for routing requests to
the appropriate hypervisor or management layer.

Backend module [libvirt]:    #模块

Configuration complete.

=== Begin Configuration ===
backends {
        libvirt {
                uri = "qemu:///system";
        }

}

listeners {
        multicast {
                port = "1229";
                family = "ipv4";
                interface = "virbr0";
                address = "225.0.0.12";
                key_file = "/etc/cluster/fence_xvm.key";
        }

}

fence_virtd {
        module_path = "/usr/lib64/fence-virt";
        backend = "libvirt";
        listener = "multicast";
}

=== End Configuration ===
Replace /etc/fence_virt.conf with the above [y/N]? y   #配置文件存放路径
4,kvm启动服务
[root@kvm ~]# systemctl start  fence_virtd
[root@kvm ~]# netstat  -ntplua |grep 1229
udp        0      0 0.0.0.0:1229            0.0.0.0:*                           44314/fence_virtd
5,vm开放防火墙端口
firewall-cmd --permanent --add-port=1229/tcp
firewall-cmd --permanent --add-port=1229/udp
firewall-cmd --reload
6,集群内创建fence设备
[root@controller1 ~]#  pcs  stonith  create  fen-controller1 fence_xvm  port="vm1"  pcmk_host_list="controller1"
[root@controller1 ~]#  pcs  stonith  create  fen-controller2 fence_xvm  port="vm2"  pcmk_host_list="controller2"
[root@controller1 ~]#  pcs  stonith  create  fen-controller3 fence_xvm  port="vm3"  pcmk_host_list="controller3"
[root@controller1 ~]# pcs stonith  show --full
 Resource: fence-controller1 (class=stonith type=fence_xvm)
  Attributes: pcmk_host_list=controller1 port=vm1
  Operations: monitor interval=60s (fence-controller1-monitor-interval-60s)
 Resource: fence-controller2 (class=stonith type=fence_xvm)
  Attributes: pcmk_host_list=controller2 port=vm2
  Operations: monitor interval=60s (fence-controller2-monitor-interval-60s)
 Resource: fence-controller3 (class=stonith type=fence_xvm)
  Attributes: pcmk_host_list=controller3 port=vm3
  Operations: monitor interval=60s (fence-controller3-monitor-interval-60s)
port问vm1 为kvm的damon name , pcmk_host_list为主机名
7,测试一下,,可以使用 或者直接关闭vm的eth0 接口
[root@controller1 ~]# pcs stonith fence controller1这里默认会重启这台机器
没写完!!后面再写